MK Quilts | Handi Quilter Longarms | Pro-Stitcher | Quilting Classes | Quilt Finishing
  • Home
  • Support
  • MKQ University
  • Machine Sales
    • Request a Quote
    • New HQ Machines >
      • Moxie 15
      • Amara 20
      • Forte/Amara 24
      • Infinity 26
    • Pro-Stitcher
    • Pro-Stitcher Lite
    • Extended Warranty
    • Self Installation
    • Used Machines
    • References
    • Your Testimonial
    • Refer-a-customer
  • Quilt Shop
    • Class Calendar
  • Online Store
  • Longarm Quilting Services
  • Quilts For Sale
  • Contact Us
  • About Us/Techs

Resolving Longarm Machine Issues

Following these steps should resolve or help identify the problem you are having with your longarm machine.  Please follow every step - even the obvious step such as "Is your machine turned on?"  The steps would not be identified here if someone had not actually had that specific issue.
THIS IS NOT AN OFFICIAL HANDI QUILTER DOCUMENT.  All information contained in this document are the responsibility of MK Quilts.  Recommendations for changes should be emailed to webmaster@mkquilts.com.
RESTART EVERYTHING
  1. If your machine is on, do a proper shutdown.  Turn off the front power switch, then the back power switch, and then UNPLUG.
  2. Before powering up, visually and physically inspect every cable connection.  Disconnect and reconnect each connection.  Verify that the cables are plugged into the correct ports.
  3. Plug in your machine.  Newer machines may have multiple plugs if you have a Pro-Stitcher.
    1. Make sure you are plugging the PS charging cable into the correct port and not the audio port on the tablet.
  4. Turn on the machine first!  Turn on the switch at the back of the machine and then the switch at the front of the machine, if present.  Confirm that the machine has powered up by the lights and beeps that occur.  If the machine fails to power up, perform the following checks...
    1. Use another lamp or appliance to confirm that there is power to the outlet or UPS that you are plugged into.
    2. Check that the power cords are firmly plugged into the machine (and Pro-Stitcher).
    3. Make sure your front handlebars are plugged into the machine for some older models.
    4. Unplug any accessories you may have drawing power from the machine USB ports and try again.
    5. If possible, check the fuse found near the power plug at the back of the machine.  (This is extremely rare.)
    6. Call for support.
  5. Turn on the Pro-Stitcher, if installed.  Newer machines only have a virtual machine panel when PS is installed.  The PS must be running for proper machine operation even if not using the PS functionality.  The virtual machine panel is accessed by touching the silver bar at the top left of the PS screen.  Pro-Stitcher troubleshooting is found in a different guide.​
Testing Basic Functionality
YOU SHOULD UNDERSTAND THIS:  One important distinction that you should learn is that the machine controls whether it stitches, not the Pro-Stitcher.  The PS simply moves the machine around once the RUN button is pressed.  Assuming that you followed the restart instructions above, you should have your cables securely connected in the right places.  All current Handi Quilter longarms have stitch regulation, meaning that it will not only run in a 'Manual - constant speed' mode but also in a regulated 'Precision' mode that will only stitch when the machine moves.  The third mode is called 'Cruise' mode and will continue to stitch at a minimum speed even if you do not move the machine.  But will speed up to give you the correct number of stitches-per-inch during normal operations. 
Intermittent Problems
If you are trying to diagnose an intermittent problem, your smart phone can be your best tool.  Take video as you are testing.  Sharing the video with support can save a lot of time.  Sharing or emailing these videos may be challenging due to their size, however support can instruct you as to your options.
Testing Stitching - Controls and Encoders
  1. Turn on your system as stated above.
  2. Remove the bobbin case and the needle from your machine.  This will ensure that no quilt is damaged if currently loaded.
  3. Clean out the bobbin case area.
  4. Turn the rear hand wheel through several rotations counter-clockwise (when viewed from the rear).  If there is any unreasonable restriction or blockage, attempt the following as necessary...
    1. Rock the handwheel back and forth to clear a thread jam at the Hook and Basket (H&B) - the main part you snap the bobbin case into.  There are grooves designed to cut thread.
    2. Remove your hopping/presser foot and then remove the needle plate.
    3. Examine and clean the Hook and Basket from the top.  Use a small brush and rotate the hand wheel slowly to advance the H&B.  There should be no noticeable nicks or scratches.
    4. If you have had recent tension or stitching issues, check the timing while you are there.  This does not require tools.
      1. Temporarily re-insert the needle.
      2. Rotate to the lowest point the needle will travel.
      3. Rotate the hand wheel until the hook point reaches the far side of the needle.  There should not be a visible gap between the needle, nor should it hit and deflect the needle to any extent.  The hook point should be one milli-meter from the top of the eye of the needle.  The needle should have moved up 2.2mm (2.6mm on an Infinity) from the lowest point at the time the hook reaches the far side of the needle.
      4. Use a smart phone camera with zoom to document any questionable configuration.
      5. Remove the needle and replace the needle plate and hopping/presser foot before proceeding.
    5. ​​If you can not get the H&B to rotate using the back wheel, call support.
  5. ​Press the left needle UP/DOWN button.  One press for down, one press for up.   If the needle bar does not move up and down, do the following...
    1. Ensure that the machine is powered.
    2. Ensure that the handle bars are plugged into the machine.
    3. Ensure that the handle bar buttons have not been reversed through the control panel.  This would result in the left up/down button to become the "+" button and the symbols would be wrong.  In some rare cases, people put the stickers on the opposite handlebars and intentionally operate this way. 
    4. If you have a PS, press the 'Half Stitch' and/or 'Full Stitch' buttons found on the Pro-Stitcher "Pro-Stitcher Tab."  (Note that the handlebar buttons will not work on older HQ16 machines when PS is enabled.) If they work, call support about a faulty front handle bar.
    5. If you have rear handle bars, attempt to use them instead.  If they work, call support about a faulty front handle bar.
    6. Hit the run/stop button and move the machine in a circle.  If it stitches, hit run/stop again.  Call support about a faulty up/down button.
  6. ​Put the machine in Manual mode and press the run/stop button.  The needle bar should go up and down.  Increase and decrease the speed using the front panel or the handle bar buttons.  Press run/stop button to stop the machine.  NOTE:  The machine may stop with a "Thread Break Sensor Error" because the thread is not pulling the tension spring past the sensor when equipped and enabled.  You may disable the sensor to run the test longer.  If not working properly, take a video of the test and call support.
  7. Put the machine in Precision mode and press the run/stop button.  THE MACHINE WILL NOT STITCH UNTIL YOU MOVE THE MACHINE.  Move the machine in straight lines forward and back to test the 'Y-axis encoder'.  Move the machine in a straight line to the left and right to test the 'X-encoder'.  The needle bar speed should follow the speed of your movements.  If you are not seeing the consistent needle bar movement that you expect, do the following...
    1. Make sure that you are not in Baste mode.  Set your stitches-per-inch to at least 10.
    2. Try doing the same movement test at different places on the frame.
    3. Examine the encoders:  Y-encoder is on the side of the longarm with the wheel rolling on top of the carriage.  X-encoder is on the back of the carriage with the wheel rolling on the back edge of the frame.
      1. Make sure the rubber wheel is on the wheel and touching the carriage or frame so it roles.
      2. Look for dirt and obstructions that may keep the wheel from turning on the encoder.
      3. Watch for cables that may lift the encoder wheel during movement of the machine.
      4. With the machine in Precision mode and in Run mode, manually rotate the wheel on the encoder.
    4. ​Examine and reconnect the encoder cables.  (Some will disconnect from both ends.)
    5. Reverse the X and Y encoder cables to see if the problem follows the cable.  Newer machines have separate cables.  Older machines share a ribbon cable.  In both cases, a temporary swapping of the cables connected to the encoders can be done without a reset.
    6. If the Y-encoder is scraping on the carriage, it is likely that the bracket has been bent.  Lay the machine on the side and bend the bracket with the spring back into place.  Newer models have been modified to prevent this.  Details can be found on the MKQU Troubleshooting course.
    7. If only one of the encoders is exhibiting problems, it is likely the cable or encoder that needs to be replaced.  If neither are working, the controller board may need to be replaced.  In either situation, take video of the testing and call support.
    8. Pay attention to possible issues with the frame.  Are the tracks aligned?  Does the carriage or machine rock?
  8. Re-install the bobbin case and needle for further stitch testing.
  9. Load a practice sandwich of decent fabric, batting, and backing.  If a quilt is already loaded, placing spare fabric over the exposed batting at the edge of the quilt may give you enough area to stitch.
  10. It is time to test the stitch quality.
Unexpected Machine Noise
There are several different noises.  Some can be beneficial.  For example, as the bobbin is used up, it will begin to rattle in the basket of the Hook & Basket letting you know that you will be running out of the bobbin thread.  Sometimes noise can indicate a problem.  Sometimes it is just a nuisance and does not cause any problem.  But if you purchase a new machine, you don't want to have a rattle.  This is why MK Quilts prefers to sell the floor model systems that they have been able to certify as 'sound'.
Due to the poor quality and noise cancellation on cell phones, it is best to record a video with your cell phone from various points around the machine.  If this is a new machine, you need to make it an issue sooner than later.  Not all retailers will swap out the machine like MK Quilts has done several times.  (We sell nationally and tweaking a system is easier to do when we have it in our hands.)  
Hook & Basket Noise
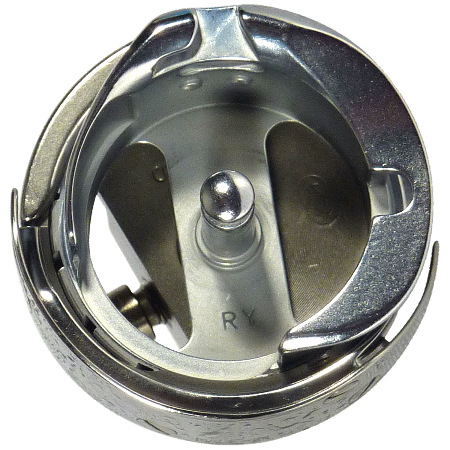
The Hook and Basket is the heart of the machine.  It is the part that creates the stitch.  Although not clearly stated, Handi Quilter considers the H&B an expendable item because failure to oil (or using the incorrect oil) can cause the H&B to deteriorate.  In most cases, the stitching does not suffer but the level of noise will increase.  The unofficial point at which we believe the H&B becomes noisier is just over 20 million stitches.  This does not mean that your stitches start to suffer.  This will cost your $150-$200 to replace and requires that your machine be re-timed.

Hook & Basket Replacement Policy

Handi Quilter considers the Hook & Basket (H&B) an expendable item.  The H&B should last the life of a machine, maintaining good stitch quality as long as it is properly oiled and maintained.  A bobbin case should not be getting hot from use in an H&B.  Swap out the bobbin case to avoid damaging the H&B.  Only use the Handi Quilter provided oil on the H&B.  Third party substitutes have proven to lead to extra wear of the H&B.
MK Quilts has experienced situations where a new systems makes more noise in the H&B area and have swapped out the part at no cost to the customer.  (This is one benefit of buying our floor models.)  This can not be measured by simple decibels.
Some of our busiest customers have noticed that there is an increased amount of noise from the H&B after stitching 20-25 Million stitches.  However stitch quality has not suffered.
Picture
Picture
The Hook & Basket part retails for $200, however MK Quilts has been charging $150 to replace a damaged part.  That does not include the service charge for timing the system.  (Timing is the art of securing the H&B to the shaft in perfect sync with the needle movement.)
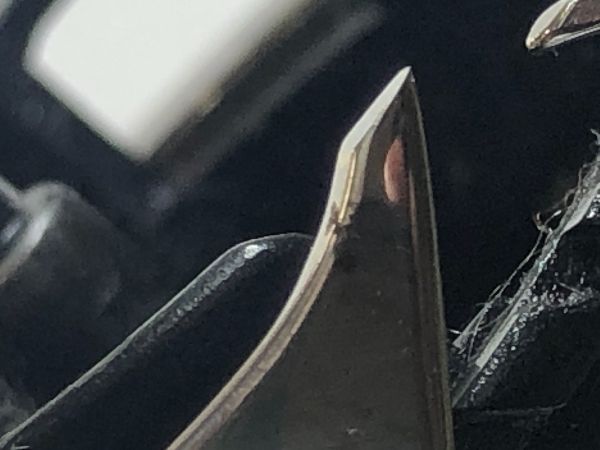
A needle strike can nick the H&B causing tension and thread shredding issues and can be hard to see.  This is obviously not a warranty situation.

At present, we do not have an easy way to define an unacceptably noisy H&B and must go by stitch quality.
MK Quilts will continue to work closely with a 
new machine owner to insure that their machine is not 'too noisy.'  We have shipped new machines to swap out a noisy system more than once.  Not all of these cases have been due to the Hook & Basket assembly.  After the initial 3 to 6 months of operation, we must consider it an expendable item.
Picture
727-935-1739 = #1 for Studio/Shop - #2 for Support - #3 for Sales
38565 US Highway 19 N - Palm Harbor FL 34684
Shop Hours: Weekdays 10am - 4:30pm.  Saturday 10am - 2pm.  Closed Sundays.
Quilts Drops should schedule an appointment.
Email:  INFO@MKQuilts.com 
Facebook:  www.facebook.com/mkquiltsfl 
MK Quilts University Facebook 
www.facebook.com/groups/MKQuiltsUniversity/
YouTube Channel:  CLICK HERE

MK Quilts uses all the latest Longarm Quilting Machines with Pro-Stitcher from Handi Quilter
Remote Support Agent
Picture
About Us
  • Home
  • Support
  • MKQ University
  • Machine Sales
    • Request a Quote
    • New HQ Machines >
      • Moxie 15
      • Amara 20
      • Forte/Amara 24
      • Infinity 26
    • Pro-Stitcher
    • Pro-Stitcher Lite
    • Extended Warranty
    • Self Installation
    • Used Machines
    • References
    • Your Testimonial
    • Refer-a-customer
  • Quilt Shop
    • Class Calendar
  • Online Store
  • Longarm Quilting Services
  • Quilts For Sale
  • Contact Us
  • About Us/Techs